
#BE
수억 건의 데이터, 맛있게 쪼개 먹는 방법 (with. Partitioning)
요약: 이 글은 Ktor 도입을 위해 시도했던 과정을 공유합니다. Ktor의 다양한 플러그인을 활용하여 팀의 개발 스펙에 맞게 서버를 구성하고, 비동기 처리와 성능 최적화를 경험한 내용을 다루며, 이를 통해 Ktor가 팀 내에서 충분히 활용 가능하다는 확신을 얻은 과정을 설명합니다.
💡 리뷰어 한줄평
bri.ghten 다른 기본적인 예제 포스팅과 다르게 실제로 팀 내에서 Ktor를 서비스로 구성하는 과정을 같이 따라가 보면서 학습할 수 있었던 좋은 글입니다.
dory.m Ktor 써보고 싶은 사람 손! Ktor를 활용해 서비스를 구성할 때 필요한 요소가 꾹꾹 눌러 담겨 있는 워니의 글 한번 보고 가세요~ 직렬화, 로깅, 메트릭 등에 대한 길잡이가 되어 줄 것입니다.
wade.hong Ktor를 도입하기 위한 교과서와 같은 글입니다. 차례로 따라 하다 보면 어느샌가 Ktor를 잘 알게 되실 겁니다.
시작하며
안녕하세요. 카카오페이 후불결제TF 워니입니다.
카카오페이는 혁신금융서비스로 소액후불결제업무(BNPL, Buy Now Pay Later)를 제공하고 있습니다.
저희 팀은 사용자들이 후불교통카드로 사용한 금액에 대해서 승인/청구/납부/연체 등을 관리하는 플랫폼을 개발/운영하고 있습니다.
저는 새로운 환경을 프로젝트에 도입하는 것을 선호합니다. 이번에도 Ktor 환경을 팀 내에 도입해보고 싶었습니다. 하지만 도입해보기 전에 카카오페이의 환경과 팀의 개발 컨벤션에 맞게 구현될 수 있는지 확인이 필요했습니다. 구현 과정과 구현하며 느꼈던 점을 공유하고자 이 글을 작성했습니다. 이 글에서는 Ktor 환경으로 구현한 내용만 다루고 있습니다. Spring 프레임워크와 비교 분석한 내용은 Spring 공화국에서 Ktor 사용하기를 참고하시기 바랍니다.
Ktor 프로젝트 만들기
Ktor 애플리케이션을 만드는 방법은 크게 두 가지가 있습니다.
- 직접 코틀린 프로젝트를 생성해서 의존성을 설정하는 방법
- Ktor에서 제공하는 Ktor Generator 혹은 IntelliJ에서 Ktor Generator를 활용해 생성하는 방법
기능별로 어떤 의존성이 필요한지 명확하게 알고 싶어 코틀린 프로젝트를 생성해서 의존성을 설정하는 첫 번째 방법을 선택했습니다.
프로젝트 생성
Ktor 애플리케이션을 만들기 위해 IntelliJ에서 Kotlin 프로젝트를 생성하고 Ktor Server 의존성을 설정했습니다.
// ktor 서버 기본 의존성
implementation("io.ktor:ktor-server-core-jvm")
implementation("io.ktor:ktor-server-netty-jvm")
서버 설정
프로젝트 생성 다음으로는 서버에 대한 설정이 필요합니다. 서버 설정에도 두 가지 방법이 있습니다.
저는 서버 설정의 가시성을 위해 EngineMain 방식을 선택했습니다.
fun main(args: Array<String>) {
    EngineMain.main(args)
}

fun Application.module() {
    routing {
        get("/") {
            call.respond("Hello, Ktor!")
        }
    }
}
설정 파일을 resources/application.yaml에 작성했습니다.
yaml로 작성한 설정 파일을 읽기 위해서는 추가 의존성이 필요했습니다.
// yaml 설정 파일을 위한 의존성
implementation("io.ktor:ktor-server-config-yaml-jvm")ktor:
deployment:
port: 8080
application:
modules:
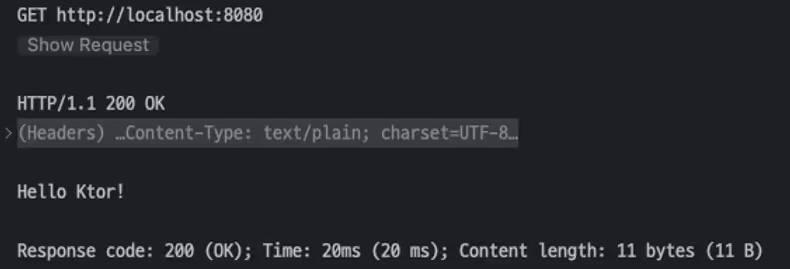
- io.doubleu0714.handson.ktorexposed.application.KtorApplicationKt.module기본 구성을 마친 상태에서 main 함수를 실행하면 서버가 실행됩니다.
서버를 실행하고 GET localhost:8080을 호출하면 아래처럼 응답을 받을 수 있습니다.
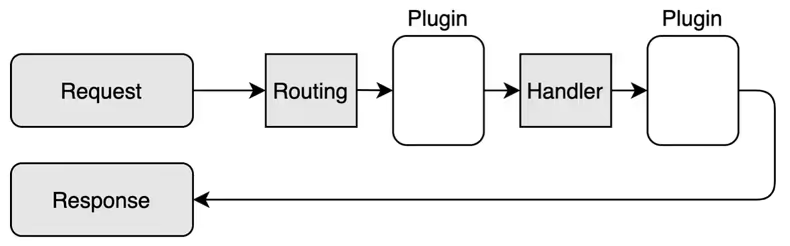
Ktor Server
애플리케이션 로직과 별도로 공통된 처리 기능을 Ktor에서는 plugin이라고 부릅니다. 예를 들면 요청/응답 body의 json serialize, deserailize 기능이 plugin으로 제공됩니다.
이렇게 제공되는 Ktor의 plugin들을 사용해서 카카오페이와 팀 개발 환경에 맞는 서버를 만들어 보겠습니다.
ContentNegotiation
Ktor에서 json 형식을 사용하기 위해서는 ContentNegotiation 의존성 설정을 하고 plugin을 설치해야 합니다. ContentNegotiation plugin은 json 뿐만 아니라 다양한 포맷의 serializer를 적용할 수 있습니다.
카카오페이에는 다양한 서비스들이 API로 통신하고 있습니다. 그리고 Content-Type이 applcation/json인 API가 대부분입니다. 저희 팀 API 스펙도 json 형식으로 설정되어있기 때문에 Ktor 서버도 json 형식으로 요청을 받고 응답할 수 있도록 ContentNegotiation plugin을 설치하겠습니다.
// content negotiation(with Jackson)을 위한 의존성
implementation("io.ktor:ktor-server-content-negotiation-jvm")
implementation("io.ktor:ktor-serialization-jackson-jvm")
implementation("com.fasterxml.jackson.module:jackson-module-kotlin")
implementation("com.fasterxml.jackson.datatype:jackson-datatype-jsr310")
fun Application.module() {
contentNegotiation()
routing {
sampleRouter()
}
}
fun Application.contentNegotiation() {
val javaTimeModule = JavaTimeModule().apply {
addSerializer(LocalDateTime::class.java, object : JsonSerializer<LocalDateTime>() {
override fun serialize(value: LocalDateTime, gen: JsonGenerator, serializer: SerializerProvider) {
gen.writeString(
value.truncatedTo(ChronoUnit.SECONDS).atZone(ZoneId.systemDefault()).format(
DateTimeFormatter.ISO_LOCAL_DATE_TIME
)
)
}
})
addDeserializer(LocalDateTime::class.java, object : JsonDeserializer<LocalDateTime>() {
override fun deserialize(parser: JsonParser, ctxt: DeserializationContext): LocalDateTime {
return LocalDateTime.parse(parser.valueAsString, DateTimeFormatter.ISO_LOCAL_DATE_TIME)
}
})
}
install(ContentNegotiation) {
jackson {
registerModule(javaTimeModule)
propertyNamingStrategy = SnakeCaseStrategy()
}
}
}router가 많아지면 코드 가독성이 좋지 않기 때문에 목적에 맞게 SampleRouter클래스를 만들어서 확장함수로 분리했습니다. 그리고 POST method로 요청을 받고 응답을 주는 router를 추가해서 호출을 해보겠습니다.
fun Route.sampleRouter() {
    get("/") {
        call.respond(Sample("doubleu0714", 30, LocalDateTime.now()))
    }

    post("/") {
        val sample = call.receive<Sample>()
        call.respond(sample)
    }
}

data class Sample(
    val name: String,
    val age: Int,
    val createdAt: LocalDateTime,
)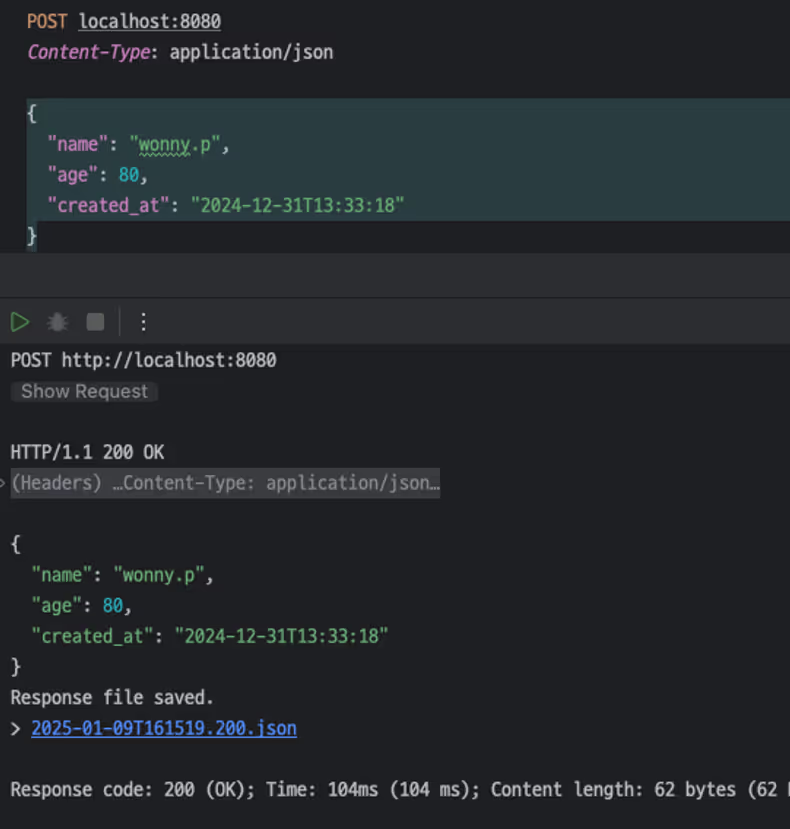
의도한 대로 요청, 응답 body의 deserailize, serialize가 잘 되는 것을 확인할 수 있습니다.
CallLogging & DoubleReceive
로깅은 서비스 운영에 중요한 영역이라 생각합니다. CallLogging은 요청, 응답에 대해서 원하는 포맷으로 로깅할 수 있는 기능을 제공하고, DoubleReceive는 요청 body stream을 중복으로 읽을 수 있도록 해줍니다.
저희 팀도 요청, 응답, 애플리케이션 로그들을 팀 내에서 정의한 포맷에 맞게 기록하고 있습니다.
Ktor에서는 CallLogging과 DoubleReceive plugin을 사용해서 로깅을 구현할 수 있습니다.
CallLogging 설정 중 하나로 mdc에 값을 설정할 수 있는 기능이 있습니다. 저희 팀은 MDC에 UUID를 넣어서 하나의 요청에 대한 모든 로그를 추적하고 있습니다. 이 기능을 활용해서 팀 스펙을 맞춰보도록 하겠습니다.
// CallLogging & DoubleReceive 위한 의존성
implementation("io.ktor:ktor-server-call-logging-jvm")
implementation("io.ktor:ktor-server-double-receive-jvm")
implementation("ch.qos.logback:logback-classic:1.5.15")
implementation("io.github.microutils:kotlin-logging-jvm:3.0.5")
fun Application.module() {
contentNegotiation()
callLogging()
routing {
sampleRouter()
}
}
fun Application.callLogging() {
install(DoubleReceive)
install(CallLogging) {
level = Level.INFO
mdc("REQUEST_ID") { _ ->
UUID.randomUUID().toString().substring(0, 7)
}
format { call ->
val uri = call.request.uri
val method = call.request.httpMethod.value
val queryParams = call.request.queryParameters.toString()
"uri=$uri, method=$method, queryParams=$queryParams"
}
}
}저희 팀은 application 로그와는 별도로 요청 body와 응답 body를 json 포맷으로 로깅을 하고 있습니다. 다만 해당 로깅 스펙을 위한 기존 plugin에는 다소 아쉬운 부분이 있었습니다. 바로 DoubleReceive plugin을 활용하면 요청 body는 중복으로 읽을 수 있지만 응답 body는 중복으로 읽을 수 없다는 점이었습니다.
이런 plugin의 아쉬운 부분을 해소하고자 Route 확장함수로 json 로깅하는 기능을 추가 구현했습니다.
fun Route.sampleRouter() {
    get("/") {
        call.respond(Sample("doubleu0714", 30, LocalDateTime.now()))
    }

    post("/") {
        val sample = call.receive<Sample>()
        call.respond(sample)
    }

    postWithLogging<Sample, Sample>("/with-logging") { request ->
        request
    }
}

inline fun <reified T : Any, reified R : Any> Route.postWithLogging(crossinline block: suspend (T) -> R) {
    post {
        val request = call.receive<T>()
        val response = block(request)
        val logFormat = LogFormat(
            requestId = MDC.get("REQUEST_ID"),
            host = call.request.host(),
            port = call.request.port(),
            method = call.request.httpMethod.value,
            url = call.request.uri,
            serviceName = "ktor-exposed-sample",
            request = Request(
                headers = call.request.headers.toMap(),
                body = request
            ),
            response = Response(
                status = call.response.status()?.value ?: 500,
                headers = call.response.headers.allValues().toMap(),
                body = response
            ),
            params = call.request.queryParameters.toMap()
        )
        jsonLogger.info { objectMapper.writeValueAsString(logFormat) }
        call.respond(response)
    }
}
많이 고민하지 않은 코드라 아쉬운 부분은 많지만, 저희 팀 로깅 스펙을 맞출 수 있는 방법이 있다는 점에서 만족했습니다.
Status Pages
Ktor에서도 global exception handler를 StatusPages plugin으로 제공해 줍니다.
Ktor router 마다 exception을 처리하는 코드를 작성하면 중복이 발생할 수 있고 변경에 취약할 수밖에 없습니다.
그래서 exception에 대한 처리를 global로 처리할 수 있는 기능이 필요합니다.
fun Application.module() {
    contentNegotiation()
    callLogging()
    statusPages()
    routing {
        sampleRouter()
    }
}

fun Application.statusPages() {
    install(StatusPages) {
        exception<Throwable> { call, cause ->
            call.respond(
                HttpStatusCode.InternalServerError,
                CommonErrorResponse(
                    errorCode = "INTERNAL_SERVER_ERROR",
                    errorMessage = "내부 오류입니다.",
                    causeMessage = cause.message
                )
            )
        }
        exception<NoSuchElementException> { call, cause ->
            call.respond(
                HttpStatusCode.NotFound,
                CommonErrorResponse(
                    errorCode = "NO_SUCH_ELEMENT",
                    errorMessage = "조회 결과가 없습니다.",
                    causeMessage = cause.message
                )
            )
        }
        status(HttpStatusCode.NotFound) { call, _ ->
            call.respond(
                HttpStatusCode.NotFound,
                CommonErrorResponse(
                    errorCode = "NOT_FOUND",
                    errorMessage = "요청한 자원을 찾을 수 없습니다.",
                    causeMessage = null,
                )
            )
        }
    }
}

data class CommonErrorResponse(
    val errorCode: String,
    val errorMessage: String,
    val causeMessage: String?,
)

fun Route.sampleRouter() {
    get("/runtime-exception") {
        throw RuntimeException("에러 발생")
    }

    get("/no-such-element-exception") {
        throw NoSuchElementException("에러 발생")
    }
}
요청 처리과정에서 발생된 exception의 타입이나 응답 http status code에 따라 에러 응답을 다르게 주도록 설정할 수 있기 때문에 상황에 맞는 유연한 응답 설정이 가능했습니다.
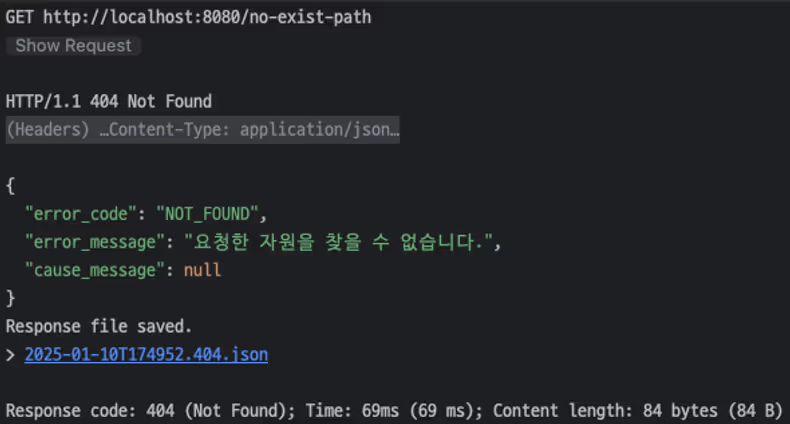
정의되지 않은 uri로 호출해서 404를 발생시켰을 때 status(HttpStatusCode.NotFound)으로 분기된 식으로 처리되어 응답이 오는 것을 확인할 수 있습니다.
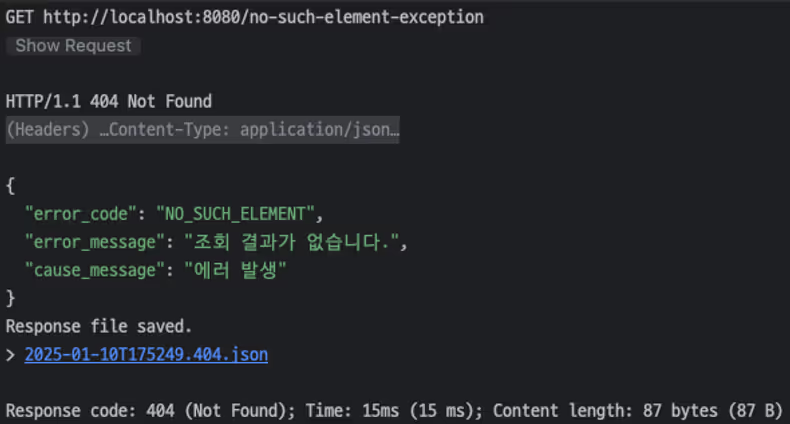
NoSuchElementException이 발생했을 때 exception<NoSuchElementException>으로 분기된 식으로 처리되어 응답이 오는 것을 확인할 수 있습니다.
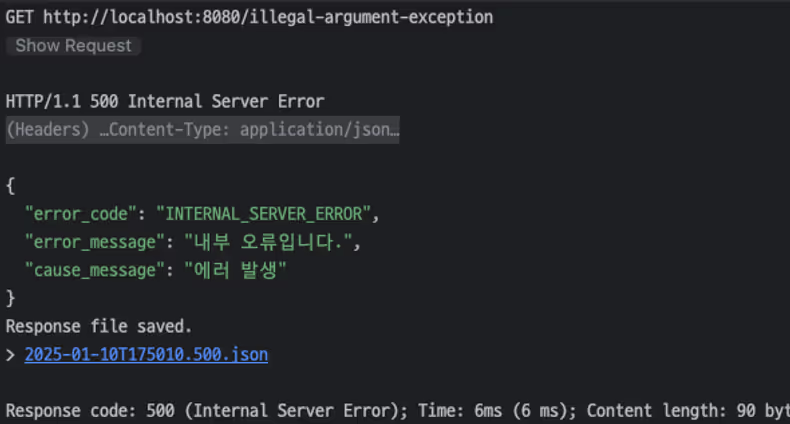
만약 정의된 타입이 분기에 없는 경우는 부모 타입에 일치하는 분기 식으로 처리됩니다.
Micrometer metrics
모니터링을 위한 기능은 서비스를 운영하면서 필수적인 요소입니다. 저희 팀 서비스는 모니터링을 위한 metrics 정보를 호출할 수 있도록 URL을 노출시키고 있고 Prometheus와 Grafana를 사용해서 서비스 자원을 모니터링하고 있습니다. Ktor server 모니터링을 위한 metrics는 Ktor plugin 중 MicrometerMetrics을 사용하면 됩니다.
// 매트릭을 위한 의존성
implementation("io.ktor:ktor-server-metrics-micrometer-jvm")
implementation("io.micrometer:micrometer-registry-prometheus:1.12.3")
fun Application.module() {
contentNegotiation()
callLogging()
statusPages()
micrometerMetrics()
routing {
sampleRouter()
}
}
fun Application.micrometerMetrics() {
val appMicrometerRegistry = PrometheusMeterRegistry(PrometheusConfig.DEFAULT)
install(MicrometerMetrics) {
registry = PrometheusMeterRegistry(PrometheusConfig.DEFAULT)
distributionStatisticConfig = DistributionStatisticConfig.Builder()
.percentilesHistogram(true)
.maximumExpectedValue(Duration.ofSeconds(20).toNanos().toDouble())
.serviceLevelObjectives(
Duration.ofMillis(100).toNanos().toDouble(),
Duration.ofMillis(500).toNanos().toDouble()
)
.build()
meterBinders = listOf(
JvmMemoryMetrics(),
JvmGcMetrics(),
ProcessorMetrics()
)
}
routing {
get("/metrics") {
call.respond(appMicrometerRegistry.scrape())
}
}
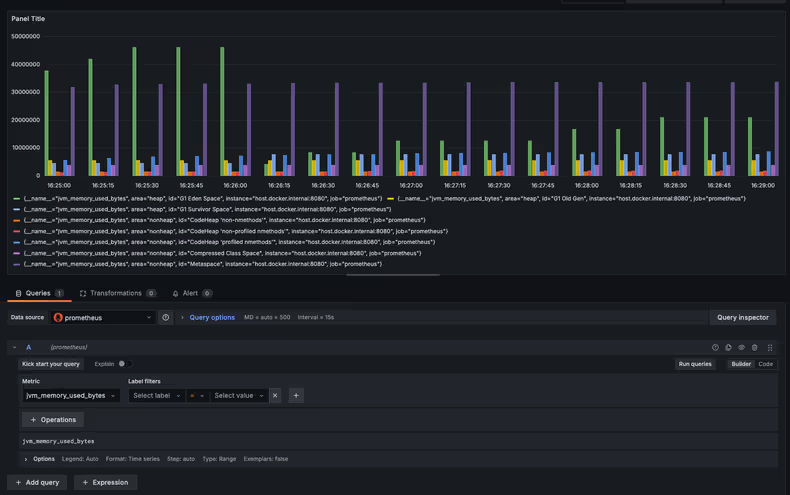
}plugin 설정에서 metrics 정보를 호출할 수 있는 url를 정의했습니다. 정의된 url로 호출해 보면 jvm 정보를 포함해서 request에 대한 기본적인 통계정보를 조회할 수 있습니다. metrics 제공 url로 prometheus가 주기적으로 호출해서 데이터를 수집하고 grafana에서 시각화를 해 보았을 때 잘 적용되는 것을 확인했습니다.
Ktor Client
카카오페이는 다양한 서비스들이 있고 각각의 서비스들은 Http 통신을 하면서 타 서비스들과 데이터를 주고받습니다. 저희 팀도 마찬가지로 많은 서비스들과 Http 통신을 하고 있고, 그러기 위해서 Http Client를 활용하고 있습니다.
Ktor에서도 Ktor client를 제공하고 있습니다. Ktor client는 core와 engine으로 나눠져 있습니다. 각 팀에서 원하는 htttp client engine을 선택해서 의존성을 설정하면 됩니다.
    // ktor client를 위한 의존성
    implementation("io.ktor:ktor-client-core-jvm")
    implementation("io.ktor:ktor-client-cio-jvm")
    // ktor client의 logging 기능을 위한 의존성
    implementation("io.ktor:ktor-client-logging-jvm")
    // ktor client의 content negotiation 기능을 위한 의존성
    implementation("io.ktor:ktor-client-content-negotiation-jvm")
Ktor client도 plugin들을 추가하면서 기능을 확장할 수 있습니다. logging과 serialize를 위한 plugin을 추가했습니다.
val client = HttpClient(CIO) {
        install(ContentNegotiation) {
            jackson {
                propertyNamingStrategy = SnakeCaseStrategy()
            }
        }
        install(Logging)
        install(HttpTimeout) {
            connectTimeoutMillis = 1000
            socketTimeoutMillis = 2000
            requestTimeoutMillis = 5000
        }
    }
Timeout
HttpTimeout plugin은 기본 내장 되어있기 때문에 의존성 설정 없이 바로 설치가 가능합니다. requestTimeoutMillis, connectTimeoutMillis, socketTimeoutMillis 세 가지에 대해서 값을 설정할 수 있습니다.
각각의 설정값 의미는 아래와 같습니다.
- connectTimeoutMillis: 서버와 연결을 맺는 시간
- socketTimeoutMillis: 서버와 연결을 맺고 서버로부터 응답 데이터를 읽는 시간
- requestTimeoutMillis: 서버와 연결을 맺고 서버로부터 응답 데이터를 읽어서 응답을 처리하는 시간. 즉, 전체 시간.
이렇게 설정한 Ktor client의 사용방법은 다음과 같습니다.
class SampleAdaptor(
    private val httpClient: HttpClient
) {
    suspend fun getAccount(payAccountId: Long): GetAccountResponse {
        return httpClient.get {
            url {
                protocol = URLProtocol.HTTPS
                host = "sandbox-mockserver.kakaopaycorp.com"
                encodedPath = "/5284e2ad-a758-4961-9704-83e502a72b7b/api/v1/account"
                parameters.append("pay_account_id", payAccountId.toString())
            }
        }.body()
    }
}

data class GetAccountResponse(
    val payAccountId: Long,
    val balance: Long,
)
설치된 plugin이 DTO 클래스 객체를 활용해 server에 요청하면 json형식으로 serialize를 하고 응답을 받으면 deserialize를 해줍니다. 호출한 요청과 응답 내용은 역시나 설치된 plugin이 아래와 같이 로그로 남겨줍니다. 로그에 대한 포맷은 각 팀의 규칙에 맞게 재정의 해야 합니다.
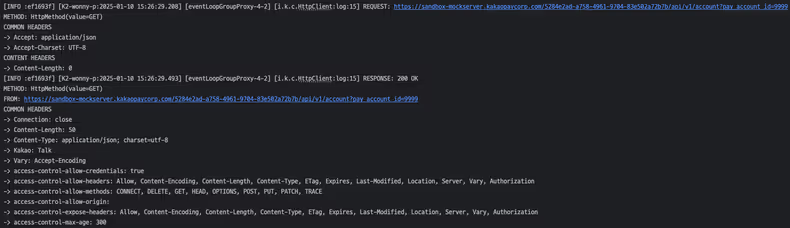
위에서 logging과 관련해 아쉬운 부분이 마찬가지로 존재했지만 확장함수나 별도 고차함수를 통해서 해결할 수 있을 거라 생각합니다.
마치며
Ktor의 plugin들을 적용하면서 팀 스펙에 맞도록 서버를 구성해 봤습니다.
서버 구성과정 초기에 느꼈던 점은 “참 손이 많이 가네…”였습니다.
저도 Spring Boot에 익숙해져 버린 개발자라 그런지 의존성 추가+yaml 설정 만으로 구성이 끝나는 것과 다르게 Ktor는 의존성 추가+plugin 설치+코드레벨 설정까지 해줘야 하기 때문에 그런 느낌을 받았던 것 같습니다.
하지만 서버 설정은 초기 구성 이후에 많은 변경이 일어나지는 않기 때문에 첫 진입장벽이라고 넘겼습니다.
그리고 필요한 기능만 plugin으로 설치해서 사용하는 수고(?)를 했기 때문에 서버 실행 속도도 매우 빨랐습니다.
이후 구현과정에서는 코틀린스러운(?) 문법으로 작성이 가능하도록 DSL을 지원해 주기 때문에 코틀린에 익숙한 저에게는 간결하고 가독성이 더 좋다고 생각되었습니다.(이 부분은 개인취향입니다.) 또한 Ktor server는 기본적으로 비동기로 동작하기 때문에 비동기 처리에 대한 고민을 덜어준다는 점도 좋았습니다. Ktor client 또한 코루틴이 지원되기 때문에 비동기 처리를 할 때도 쉽게 처리할 수 있었습니다.
Ktor로 개발해도 팀의 개발 스펙을 모두 충족할 수 있다는 확신이 들었습니다. 물론 아직 생태계가 성숙되지 않았고 참고자료도 부족하기 때문에 많은 시행착오가 있을 것이라 생각합니다. 따라서 팀 내에서 중요도가 낮은 신규 모듈이 필요할 때 팀원들에게 Ktor를 적극 추천할 생각입니다. 그리고 Ktor의 안정성을 확인한 이후에는 운영되고 있는 서비스의 일부 기능을 Ktor로 전환해보고자 합니다.


![[Project Loom] Virtual Thread에 봄(Spring)은 왔는가](/_astro/thumb.04c0dd4c_ZhvlpT.avif)


![[if kakao 2022] Batch Performance를 고려한 최선의 Aggregation](/_astro/thumb.84295604_ZC835U.avif)
![[if kakao 2022] Batch Performance를 고려한 최선의 Reader](/_astro/thumb.f4bb869d_19IKlP.avif)